For those of you who enjoy a good table-top war game, but don't have the
space to dedicate to a permanent gaming table, yet desire something bigger
and more satisfying than green cloth on the kitchen table, we offer you this
cheap and easy project which will get you a 4' x 6' table that easily
disassembles and will fit in the back of most closets.
Note, you can go for a full 4' x 8' standard gaming size but will have to
adjust accordingly; also we haven't tested the stability at that size;
caveat emptor.
Tools:
- Drill, with 1/4" bit and 1" spade bit.
- Saw.
- A saber saw or dremel helps for cleaning up.
- Sandpaper or sander.
- Narrow/Needle nose pliers / Leatherman Pliers.
- Screw Driver. (philips or standard, depending on what machine screws you
buy.)
- Hammer
- Builder's square or protractor
- Wrench or socket to match the nuts on the carriage bolts.
- Tape measure
- Felt tip marker
- Clamps (optional, but can come in handy)
|
Materials:
- 1 sheet plywood 3/4" thick. 4' x 8'
- Even though we're only using 4x6, plywood comes in 4x8
sheets. Save the other 4' x 2' to make shelves with!
- 6ea 2x4s in 6' lengths.
- 1 2x6, 8' in length.
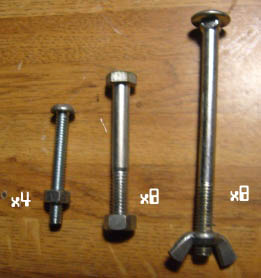
- Hardware: 1/4" diameter for all
- 8 carriage bolts, 2 3/4" long, plus nuts.
- 4 machine screws 2" long + nuts.
- 8 carriage bolts, 4" long, + wing nuts.
- 3" heavy nails. about 8.
- finishing material
This can be felt, green mat, flock, or sand, glue, and paint. (covered later)
|

| 
|
This method is geared toward people with minimal resources for major
construction or hauling. You can get a lot of the major cutting done at Home
Depot, or most hardware stores, so you only have to cut the 2x4s at home.
This also makes transportation easier than bringing home a full 4x8 sheet of
plywood. For reference, I was able to get all the materials listed home in one trip in a
2 door Toyota Celica. Get things down to 4 or 6 foot lengths and widths and
with some twine to tie your trunk shut, you should have no trouble.
Preliminary Cutting (at the store to facilitate easy transport):
- Get the plywood sheet cut twice, resulting in 2ea 4'x3' pieces and one
4'x2' piece.
- If 8 feet is too much for your car, get the 2x6 cut into two 4' lengths.
- The 2x4s are needed in 6' lengths, don't cut them.
Frame Construction & Assembly:
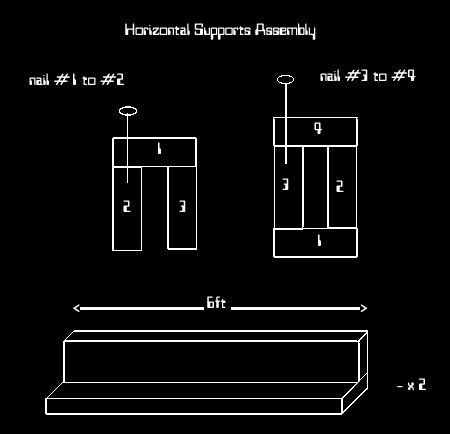
- Supports:
- Set two 2x4s on edge, and a 3rd across the top of them (making an upside
down U). Make sure the
edges are flush; clamp to hold if needed.
- Nail along the horizontal 2x4 into one of the two edgewise boards,
making an L shape.
- Flip the L over, and reposition the 3rd 2x4 flush against the edge,
making a U.
- Put a 4th 2x4 across the top, making a box. Nail as before, but into the
2x4 that is not already nailed into the bottom.
- When you are finished, you should have 2 Ls, each 6' long
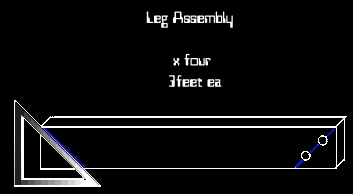
- Legs:
- Cut the remaining 2 2x4s in half, making 4ea 3' legs.
- (NB: I find 3 feet a good hight for game tables. It's a little tall
for chairs, but I always end up standing anyway, so I have to bend over
less. If you prefer a shorter table, adjust your leg heights accordingly.)
- On one end of each leg (which will be the top) use the square or protractor and straight edge, and mark a line at
45degrees, bisecting the corner of the board.
- Lay the leg onto the L support, parallel to the long side, and aligned
flush to the end. Clamp to hold, or otherwise secure the leg in place.
- Drill two 1/4" holes evenly spaced along the 45degree you have marked,
through both boards.
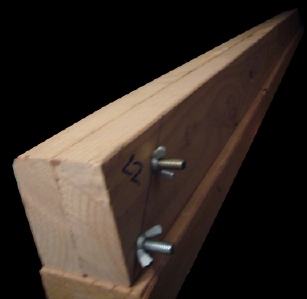
- After drilling, mark the top of the leg and the end of the horizontal
support.
- In theory if you drill all your holes at the same place on
each leg, any leg will attach to either end of both supports. However I find
it easier to mark them in pairs, so you always attach the same leg to the
same end every time.
- Something like A1, A2, B1, B2 works well, and will be
helpful when assembling the top.
- Repeat this for all 4 legs, and both ends of each horizontal support.
- Drill another 1/4" hole halfway down each leg, through the short side.
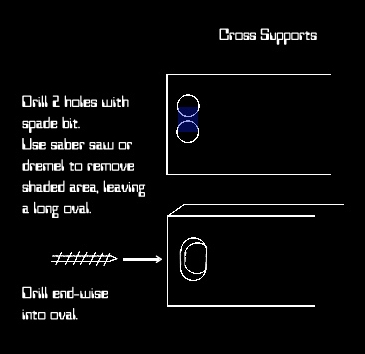
- Cross beams:
- Note: You may want to wait to cut these until you have fully
assembled the rest of the frame, and attached the top. It will be wobbly
with out these cross beams, but once it is assembled, you can see exactly
how much length you need to stiffen the legs. Or you can go by my
measurements and hope for the best.
- If so, I cut mine to 42" each.
- With the spade bit, drill two holes next to each other, about 1.5" in
from the end of the board.
- Use a saber saw, dremel, or chisel and hammer to knock out the material
separating the two holes, opening them up into on large oval.
- With the 1/4" bit, drill in from the center of the end of the board,
until you break through into the oval opening.
- Repeat this on both ends of both cross beams.
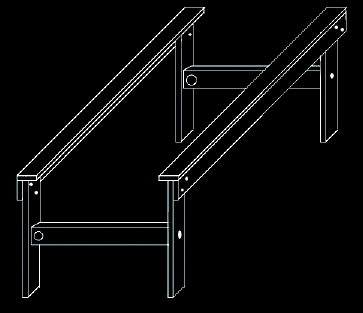
- Assembling the frame is easiest upside down.
- Set the L-shaped supports parallel to each other, 4' apart, with the
long side of the L vertical, and the short sides pointing inward to one
another.
- Seat the legs into their respective ends, perpendicular to the supports
(sticking up in the air), and slide the 4" carriage
bolts through both boards. Secure with wingnuts.
- If you have prepared the crossbeams above, grab them.
- Hold the cross beam so the holes going through the ovals line up with
the holes in the sides of the legs. Slide the 2" machine screws through the
legs so the ends protrude inside the ovals.
- Get the nuts onto the end of the screws, and finger tighten them.
- Flip the frame over so it stands right side up.
- Table Top Prep and Final Assembly:
- Note: it is recommended that you construct and assemble the table fully
to check for correct fit etc, then take the top off and do what any
finishing you choose to the table top.
- Sand the edges and corners of the plywood. Your are going to be walking around and
leaning against the edges of this, so get all the slivers and snags off.
- Place the table top pieces on the frame, line up all the edges, and
clamp or otherwise secure to the frame.
- Drill a 1/4" hole at each corner through both the table top, and the
supporting beam beneath.
- Be sure to drill in from the edges far enough that you go through the
short leg of the now inverted L support, not into the long leg at the edge.
- With the spade bit: Center the spade bit in the hole you just drilled,
and slowly open up the hole. You only want to work your way about 1/2 way
through the plywood. Don't go to fast, or you'll go all the way through.
- What you are doing is making a recess in top, so when you drop the
remaining 8 carriage bolts in, they sit below the level of the table, and
will not protrude.
- If you aren't sure of you've gone deep enough drop a carriage bolt in,
and see if it sticks up. If so, drill a little more.
- Once you have all 4 corners drilled, and the bolts dropped in, repeat on
the other side with the other piece of the tabletop.
- Once all 8 bolts are in, secure them with nuts.
- Now take your leatherman or narrow pliers and grab the nuts inside the
ovals of the crossbeams. Use a screw driver on the other side and tighten
these down to whatever degree best stabilizes the entire table.
- Finishing the top:
-
There are many ways to finish the table depending on how much time, effort
and money you want to spend on it.
- The cheapest is just to paint it:
- Either brush or spray paint the whole
top a dark brown.
- Next spray paint most of it with a dark-medium green, letting the paint
get thinner in places, leaving dark patches.
- Last, hit it with a brighter medium green, in even fewer places. Then
turn the can so the spray is parallel to the table and hit most all the
table, even the dark places. This will give you a little suggestion of
highlighting, and looks good.
- If you prefer to texture the top, I would recommend using flock (colored
sawdust) or a uniform hobby texturing material like model railroad ballast.
- Put down a piece of cardboard, as close to the full 4' width as you can
find. It only needs to be about a 1' deep, to allow you a place to set the
edge of the tabletop.
- Cover the table with white glue.
- Spread your flock, ballast, or sand all over the glue. You need to use a
lot to get a good thickness of weight to press it into the glue.
- Put the edge of the tabletop on the cardboard and lift up the other end,
dumping all the loose material onto the cardboard where you can scoop it up
and use it again.
- Repeat until there are no splotches of wood showing.
- Paint as above.
- Or, Paint as above but do a final coat of a green mixed with a light tan
(think maple sugar) dry-brushed onto the top most surface edges of your
texture material.
- Dry-brushing is done by loading up your brush (a 3" wide foam brush
works well for this stage) with paint, then wiping off all the wet paint on
a newspaper or rag. There will still be paint on the brush, just a thin
layer. Brush this light and fast, just scraping the surface of the table.
You will get a nice highlight of light paint on all the top most edges of
your material, adding to the texture.
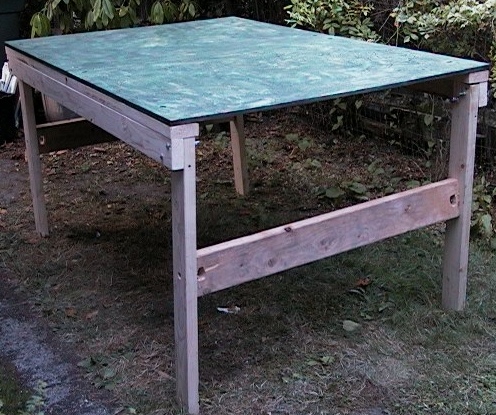
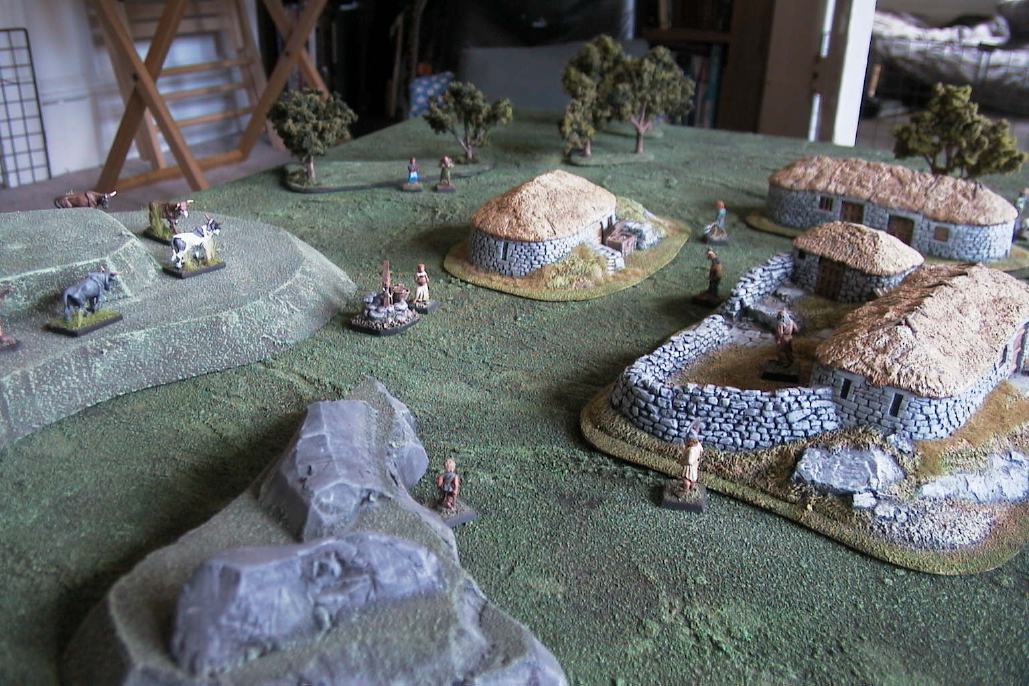
- Let it all dry, get your terrain and miniatures out, and have a battle!

- Once you're done conquering your foes, it's time to take it apart.
- Pull the tops off. These should fit in the back of most closets,
behind your clothes.
- Flip the frame over, remove the cross-beams.
- Take the bolts out of the joints between the horizontal supports and the
legs. If you drilled your holes right, you can flip the legs over, lay them
on the inside of the L, and the holes will line up. Put the bolts back in,
and each set of legs fits flush with the other leg, and locked into the
support.
- These should fit in upright in most closets (as long as it's 6' tall!).
- Download all images and instructions here
(OpenOffice Format):
Stuffit
Archive
Zip Archive

The 4x6 Collapsible GameTable is free under Creative Commons
NonCommercial-ShareAlike 2.5 License.


|
|